|
Mirror Ball Correct plug-in for Maya 4.5 (ver1.1)
by Gergely Vass
This plug-in helps to correct the distortion that occurs when using ball projection or ball environment textures. The basic idea behind this "ball" texture is that the whole environment is reflected on the surface of a mirror ball. The model used by Maya supposes that the photographer was very far from the sphere, so the region occluded by the sphere - which is obviously not visible - is infinitesimally small. But of course this doesn't hold for real images of mirror balls. Especially if we don't use a professional camera, the invisible portion of the environment is considerable. Why is that a problem? If you take a photograph of a reflecting sphere, scan it and use it as a ball environment texture the 3D ball should have the same reflection as the real one. But because of the model Maya uses to "unfold" the image the result will be distorted. This is illustrated with rendered images.
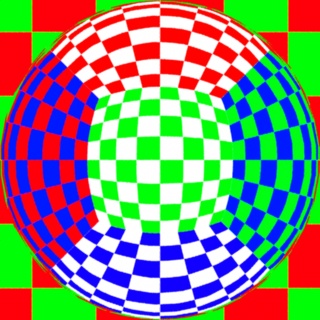
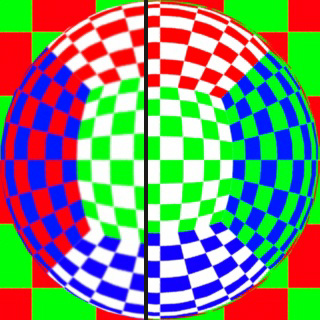
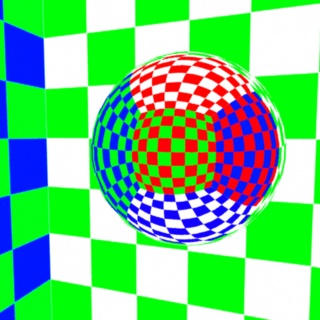
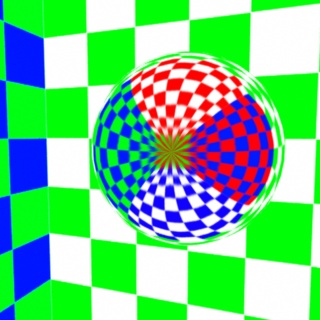
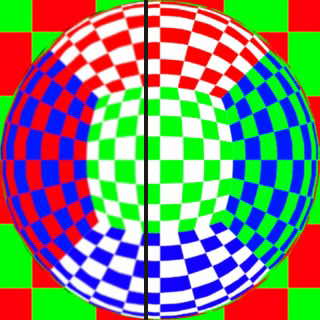
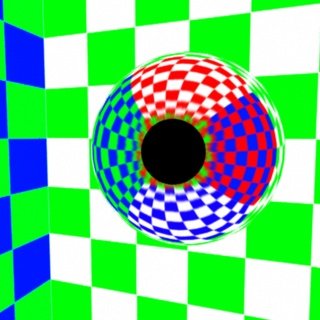
The picture #1 is a rendering of a mirror ball using raytracing. This is like a photograph, since the camera was not very far from the sphere. If we use the image #1 as a ball environment texture and turn off raytracing we get slightly different result. On test #2 the right side is the original "photograph" and the left is the environment texture. The camera position is the same for the images, however the size of the green-white wall is different. The couse of this distortion is even more visible when rendered from the back. Image #3 was raytraced and image #4 was made using the #1 image as texture. The picture is "streched" to cover the whole environment.
If this error is not visible in your project - or you just don't care - stop reading. The mirrorBallCorrect plug-in contains a new kind of shading node, called "mirrorBallCorrect". This allows you to "undistort" the texture image, so you can get a result closer to the original. The only drawback is that the region occluded by the sphere remains constant color, since we have no information in that direction. Images #5 and #6 show the results. Note that the raytraced and the textured reflections match - almost - perfectly.
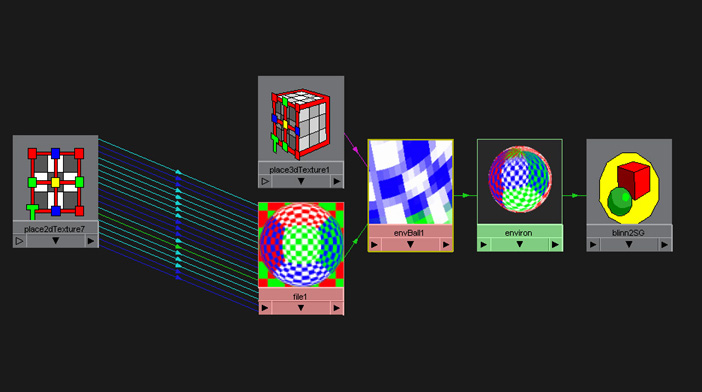
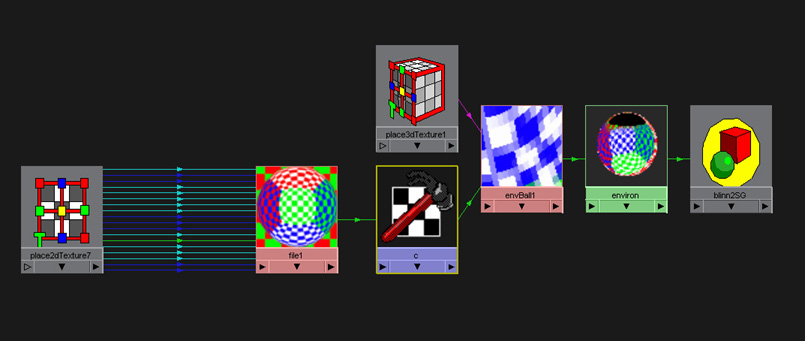
Installation Copy the mirrorBallCorrect.mll file to your ...\Bin\Plugins directory. Usage You can load and unload plug-ins with the plug-in manager (Window-> Settings/Preferences). After you loaded this plug-in you can make a mirrorBallCorrect type of node: createNode "mirrorBallCorrect" -n "some_cool_name_you_like" If you use a ball projection or a ball environment texture your shading network contains the image file node hooked in the projection/environment node.
Find the new mirrorBallCorrect node you just created in the outliner window (turn off Dag Objects Only if you don't find it) and drag and drop it with the MMB to the hypershade. In the hypershade you can connect the outColor of the image file to the color of the mirrorBallCorrect. The outColor of the mirrorBallCorrect shuold be connected to the projection/environmnet input (image). In version 1.1 I've put in a new attribute called fill color. This is the color of the unknown area. You may want to connect here the same image as well, in that case you will get the usual "strange" pattern, while the rest of the reflection remains undistorted. I might come up with some better solution to fill this hole later...
The mirrorBallCorrect node has three control-parameters. The attribute "work" turns on and off the node. The First_order node sets the distortion of the "central" part of the image, the Second_order sets the distortion on the "back". (Well, they are actually the coefficients of the distorting polinomial). The first should have some small positive number while the second a small negative number. There are two ways to set the parameters: make a sphere with environment ball reflection and place the "virtual" camera where the original camera was and try to achieve the very same look. After that place the camera behind the sphere and verify the size of the black hole. The closer the photographer was to the ball the larger the hole should be. Ohh, and use at your own risk... |